
How to Take a Screenshot on a Gateway Laptop
Are you trying to take a screenshot on your Gateway laptop but don’t know how? Don’t worry, we’re here to help. In this guide, we will walk you through the process of how to screenshot on a Gateway laptop. Plus, we’ll give you some tips and tricks for taking great screenshots every time!
- How to Take a Screenshot on a Gateway Laptop – 5 Best Methods
- Take a Screenshot with the Print Screen Button
- Take a Screenshot on a Gateway Laptop via Snipping Tool
- Take a Screenshot on a Gateway Laptop by Third-Party Software
- Taking Screenshots via Windows + G Keys Combination
- Using Windows + Shift + S Keys on Your Gateway Laptop
- Tips & Tricks for Taking Great Screenshots
How to Take a Screenshot on a Gateway Laptop – 5 Best Methods

The different methods for taking screenshots on Gateway laptops can be confusing, especially if you’re new to the brand. Luckily, we’ve got this article all set out so that will make it easy! There are actually five ways your Gateway laptop takes screenshots.
Take a Screenshot with the Print Screen Button
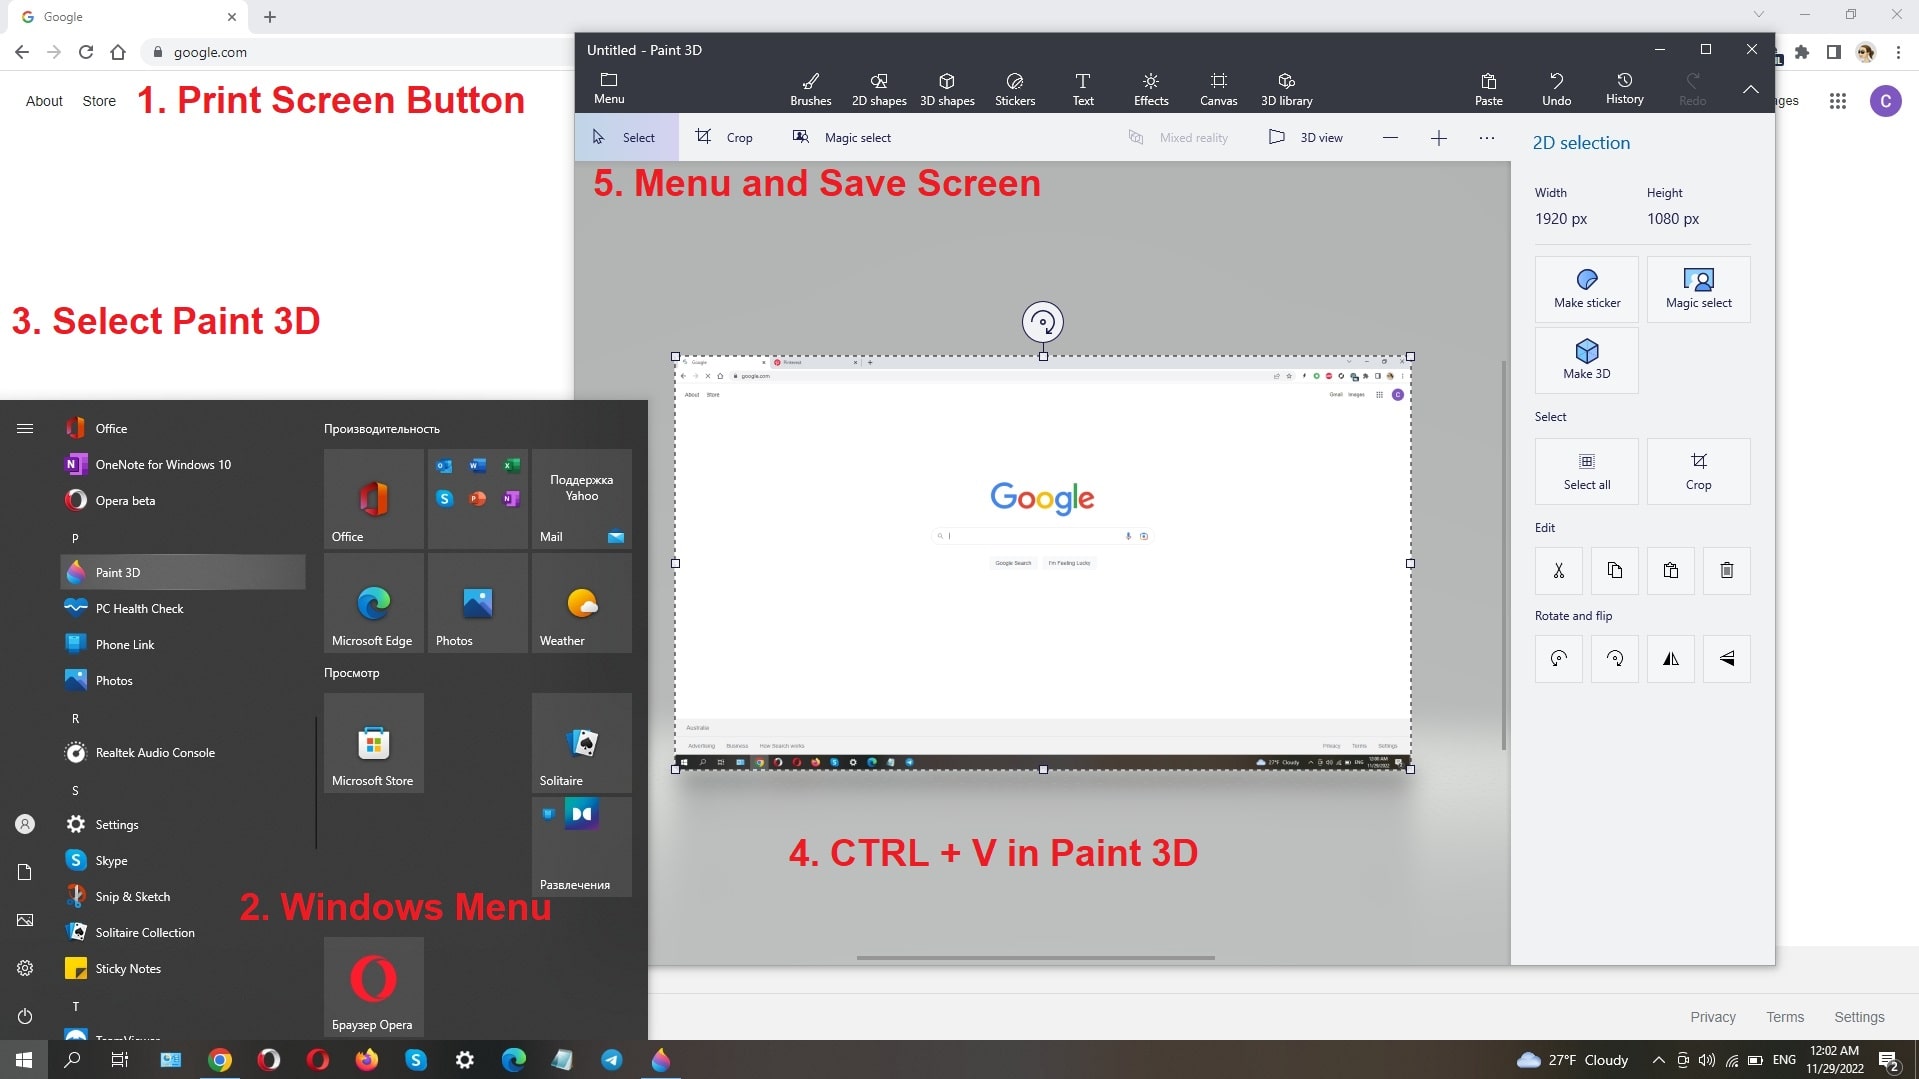
The first way to take a screenshot on your Gateway laptop is with the Print Screen button. This method will capture the entire screen and save it as an image file. To do this:
- Press down the “Print Screen” key (often abbreviated to “PrtScn”). There will be no visible indication that you have done this but don’t worry, your screenshot has been saved in your clipboard.
- You can now open up your favorite image editing programs such as Microsoft Paint or Photoshop and paste the screenshot into it. From here, you can edit or annotate your screenshot before saving it as an image file.
Take a Screenshot on a Gateway Laptop via Snipping Tool

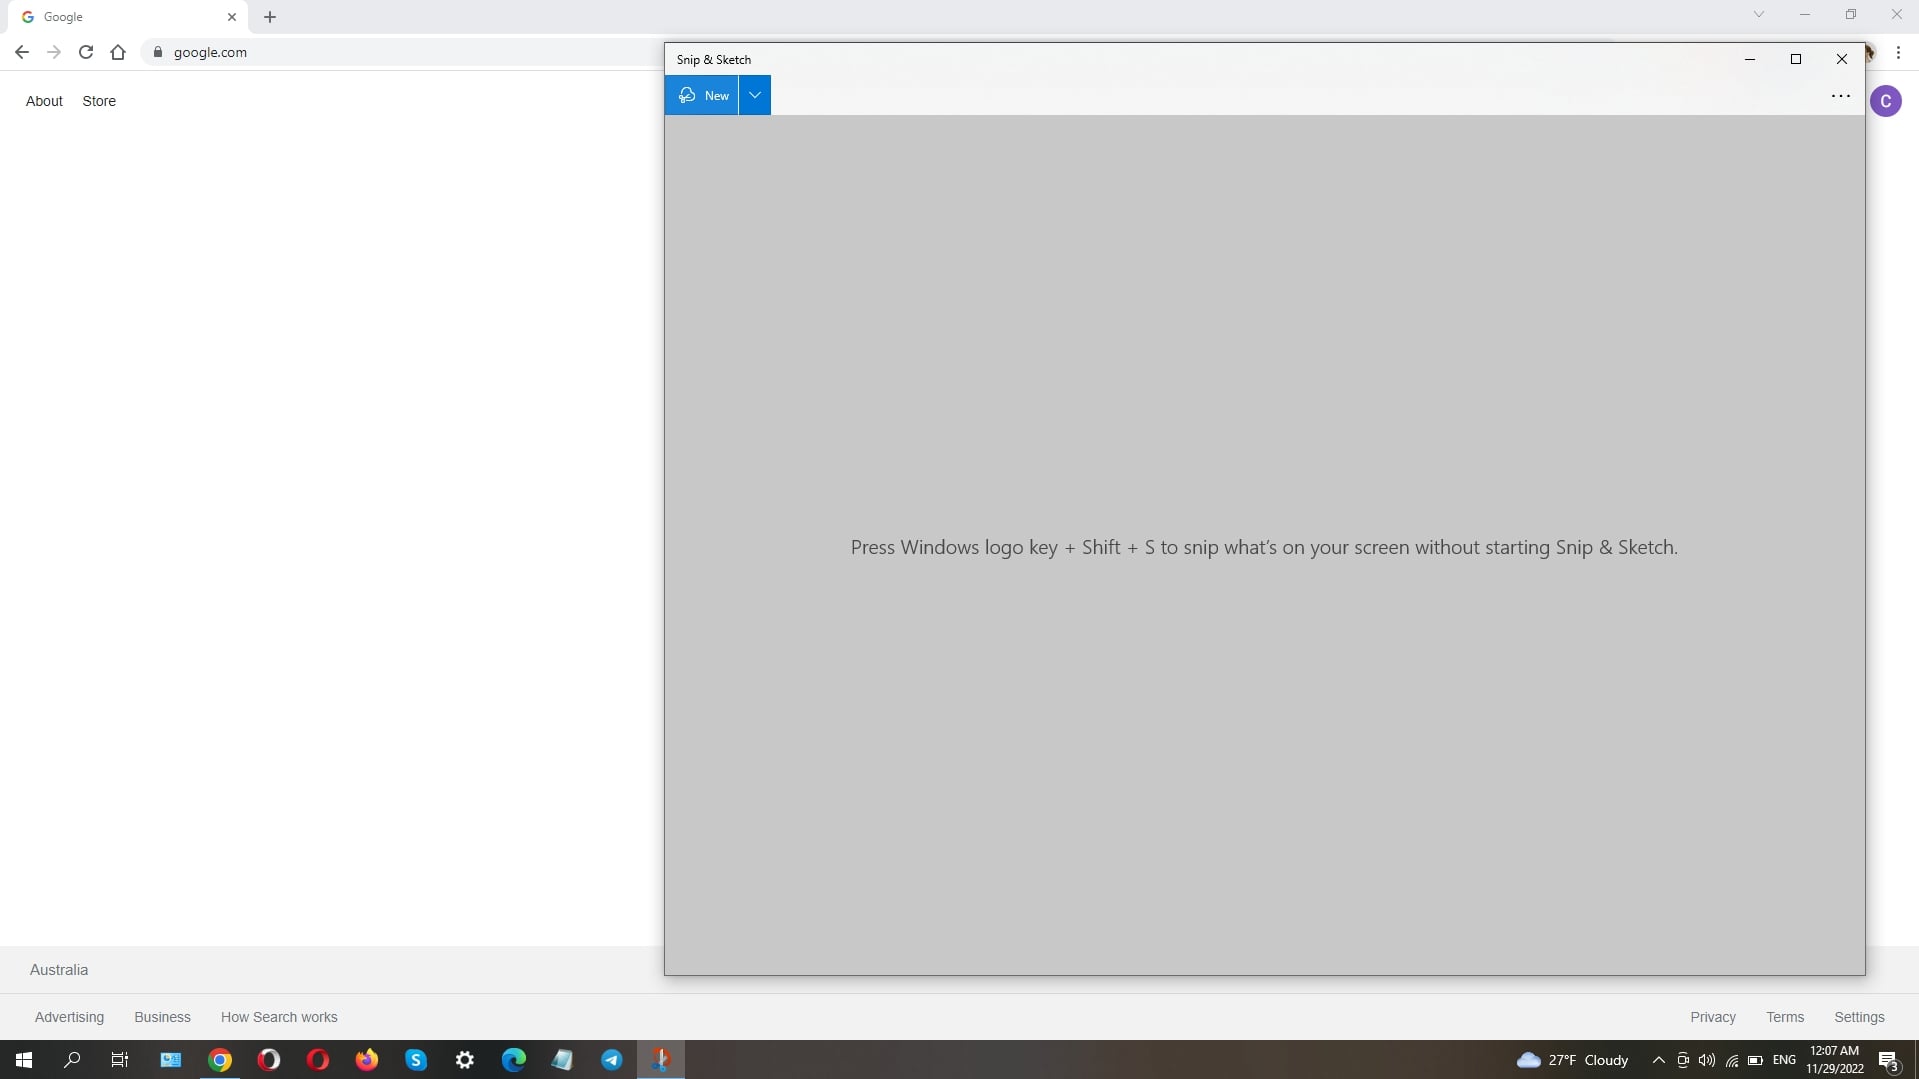
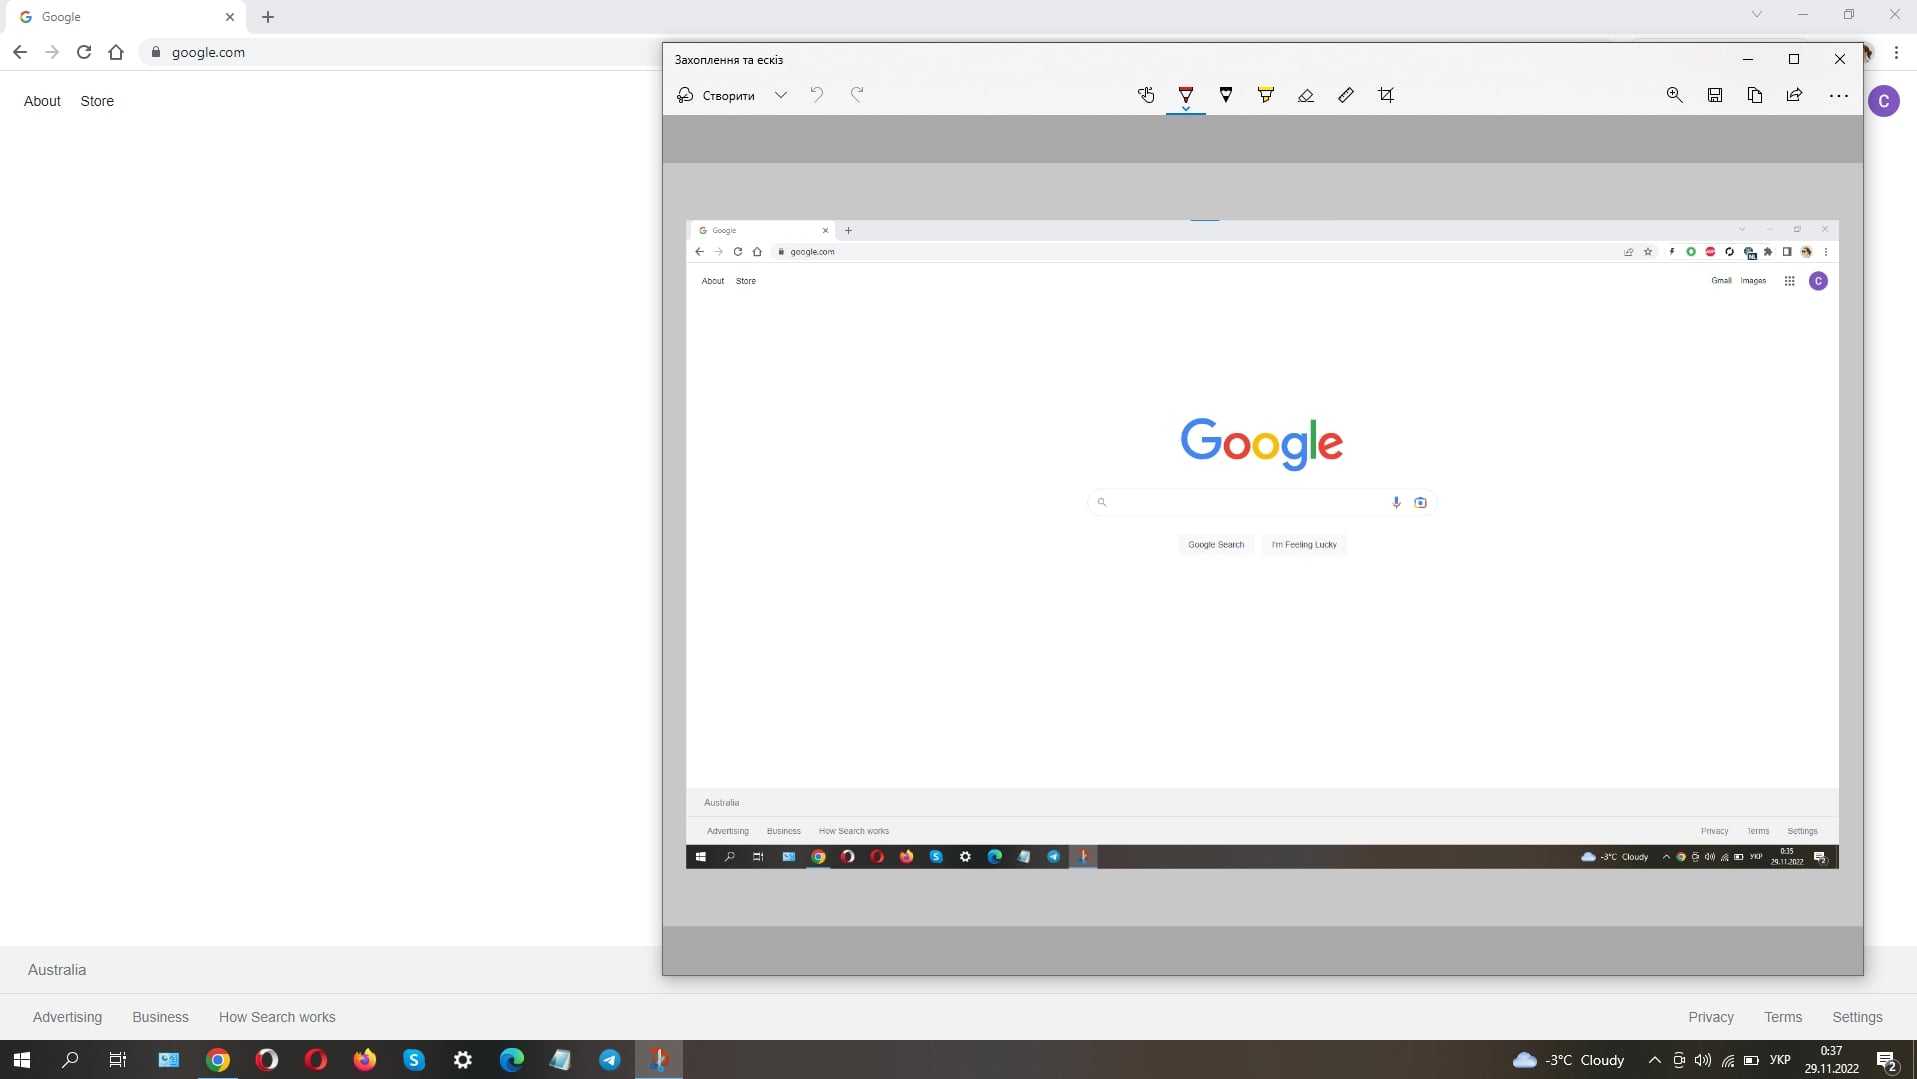
The second way to take a screenshot on your Gateway laptop is with the Snipping Tool. This tool allows you to select an area of the screen that you want to capture and save it as an image file. To use this method:
- Open the Start menu and search for “snip”.
- You should see a program called “Snipping Tool” appear in the results. Click on this program to launch it.
- Once it opens, click on the “New” button and then drag your mouse over the area of your screen you want to capture.
- When you let go of the mouse button, a new window will appear with your screenshot in it.
- From here, you can edit or annotate your screenshot before saving it as an image file.
Take a Screenshot on a Gateway Laptop by Third-Party Software
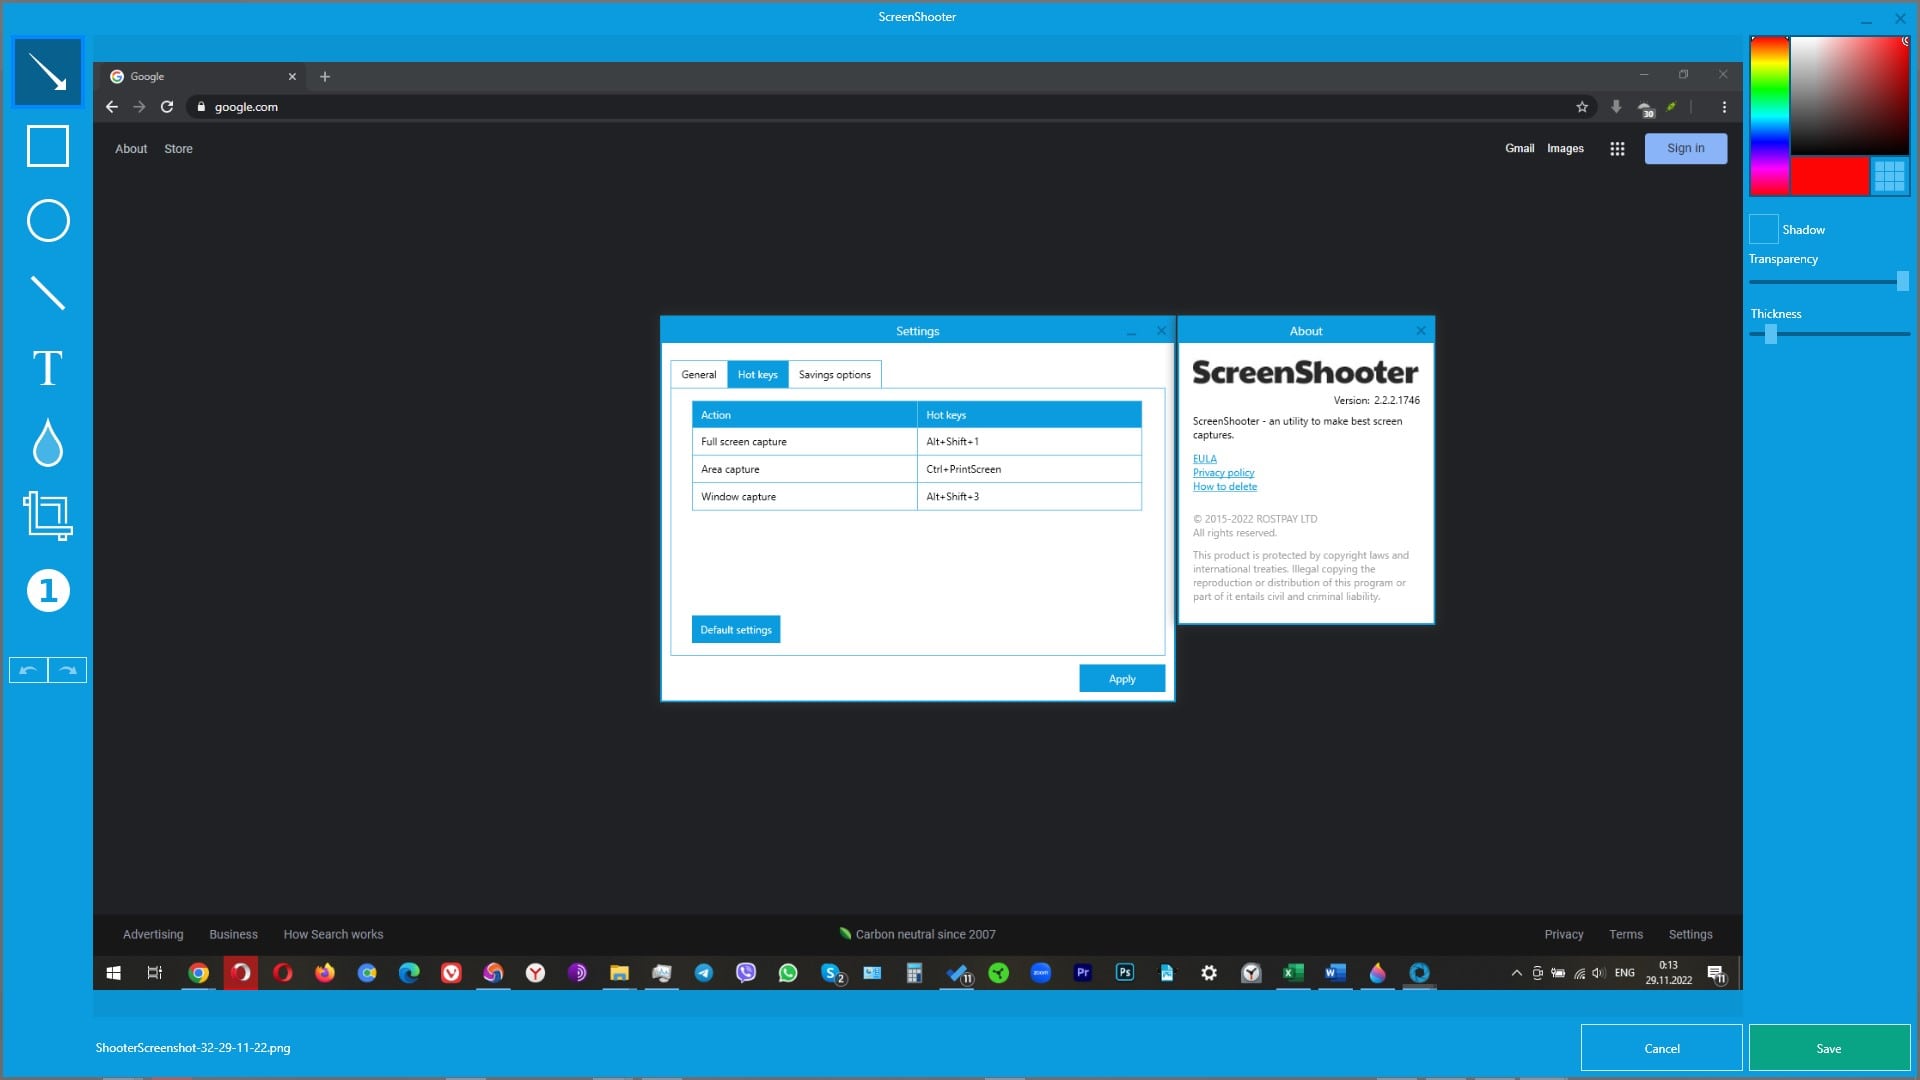
The third way to take a screenshot on your Gateway laptop is with third-party software. There are many different programs available that allow you to capture screenshots quickly and easily. Some of the most popular screenshot programs include:
| Monosnap | This program is free and allows you to capture, annotate, and share screenshots quickly. |
| Lightshot | This program allows you to capture screenshots of a specific area on your screen and then edit or annotate the image before saving it as an image file. |
| Snagit | This paid program has powerful screenshot capabilities that allow you to take scrolling screenshots, create GIFs from video clips, and more. |
| ScreenShooter | This free program allows you to capture full-screen screenshots, as well as selected areas and windows. |
Taking Screenshots via Windows + G Keys Combination
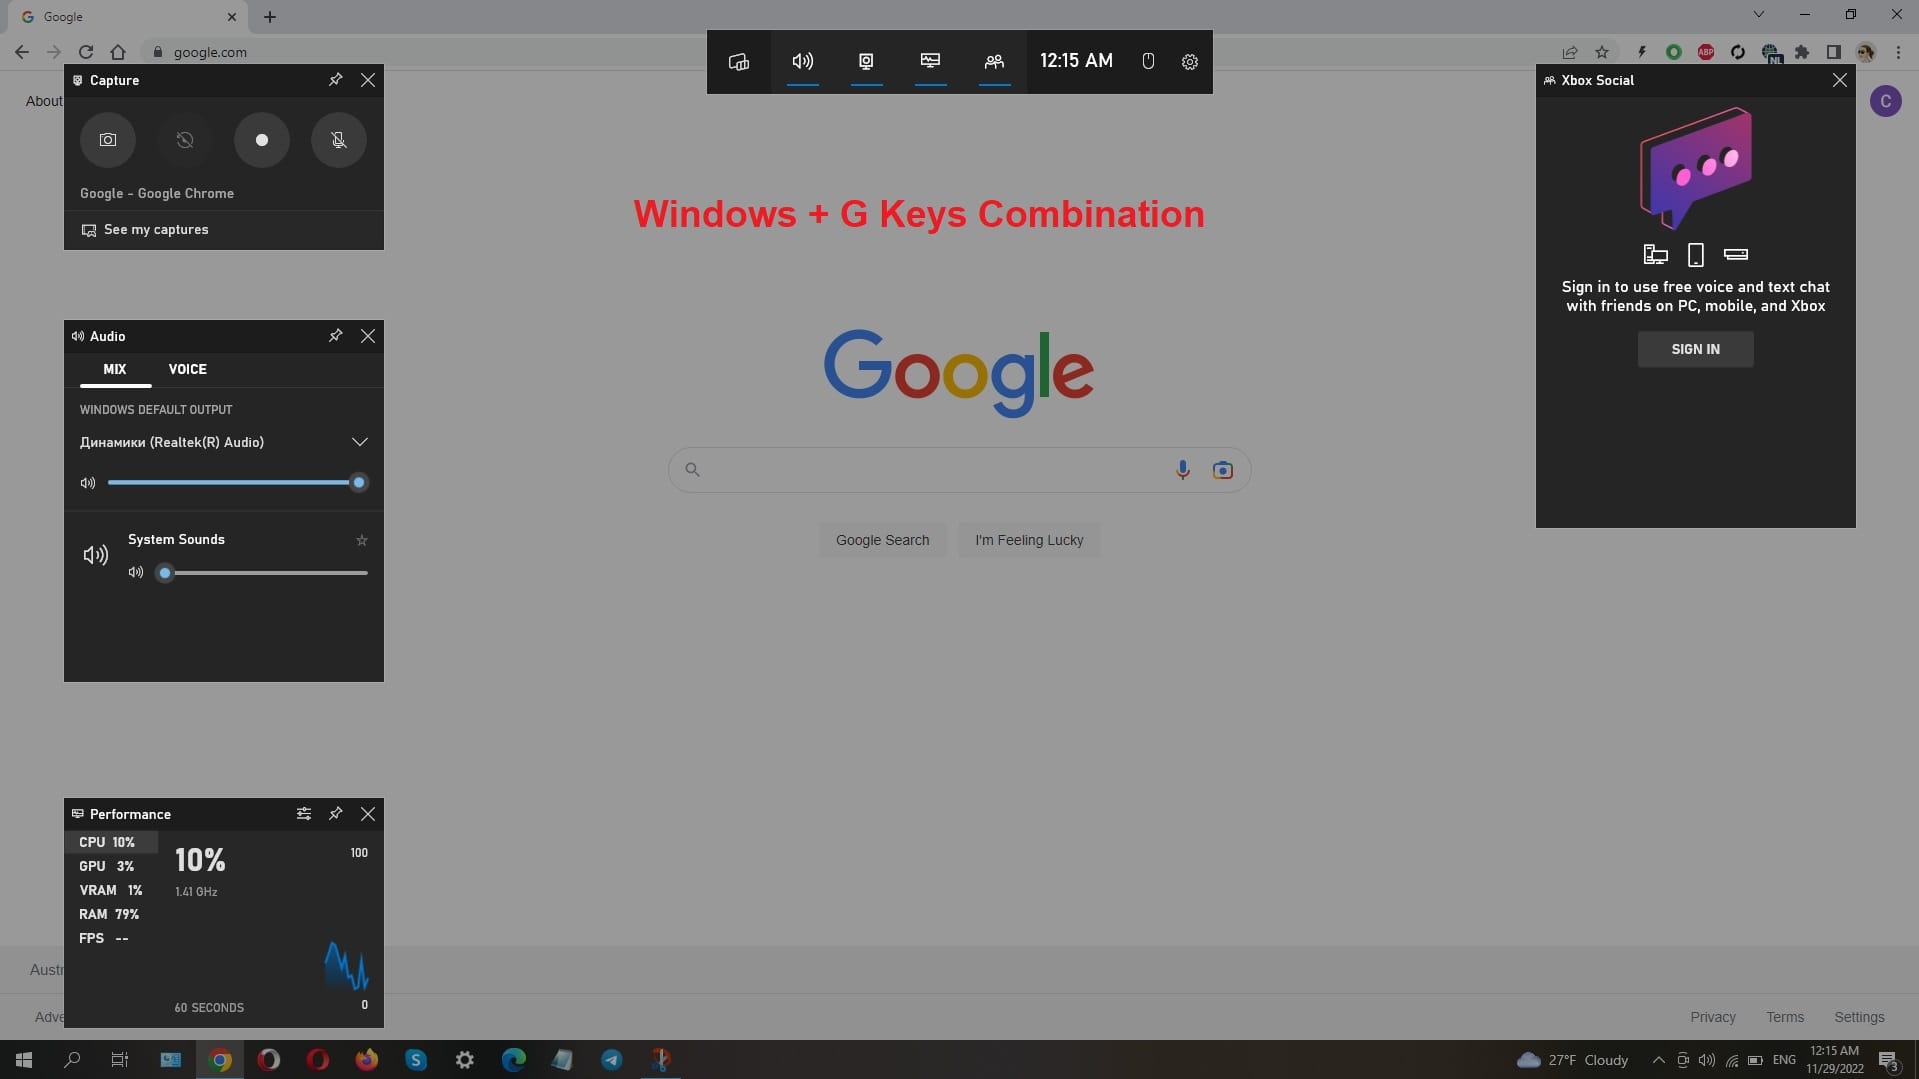
The fourth and final way to take a screenshot on your Gateway laptop is by pressing the Windows key and the “G” key at the same time.
This will open up a small window with options for capturing screenshots. You can choose between taking a full-screen capture, selecting an area of the screen, or taking a single window screenshot.
Once you have chosen how you want to capture your screenshot, click “Save” to save it as an image file in your “Pictures” folder.
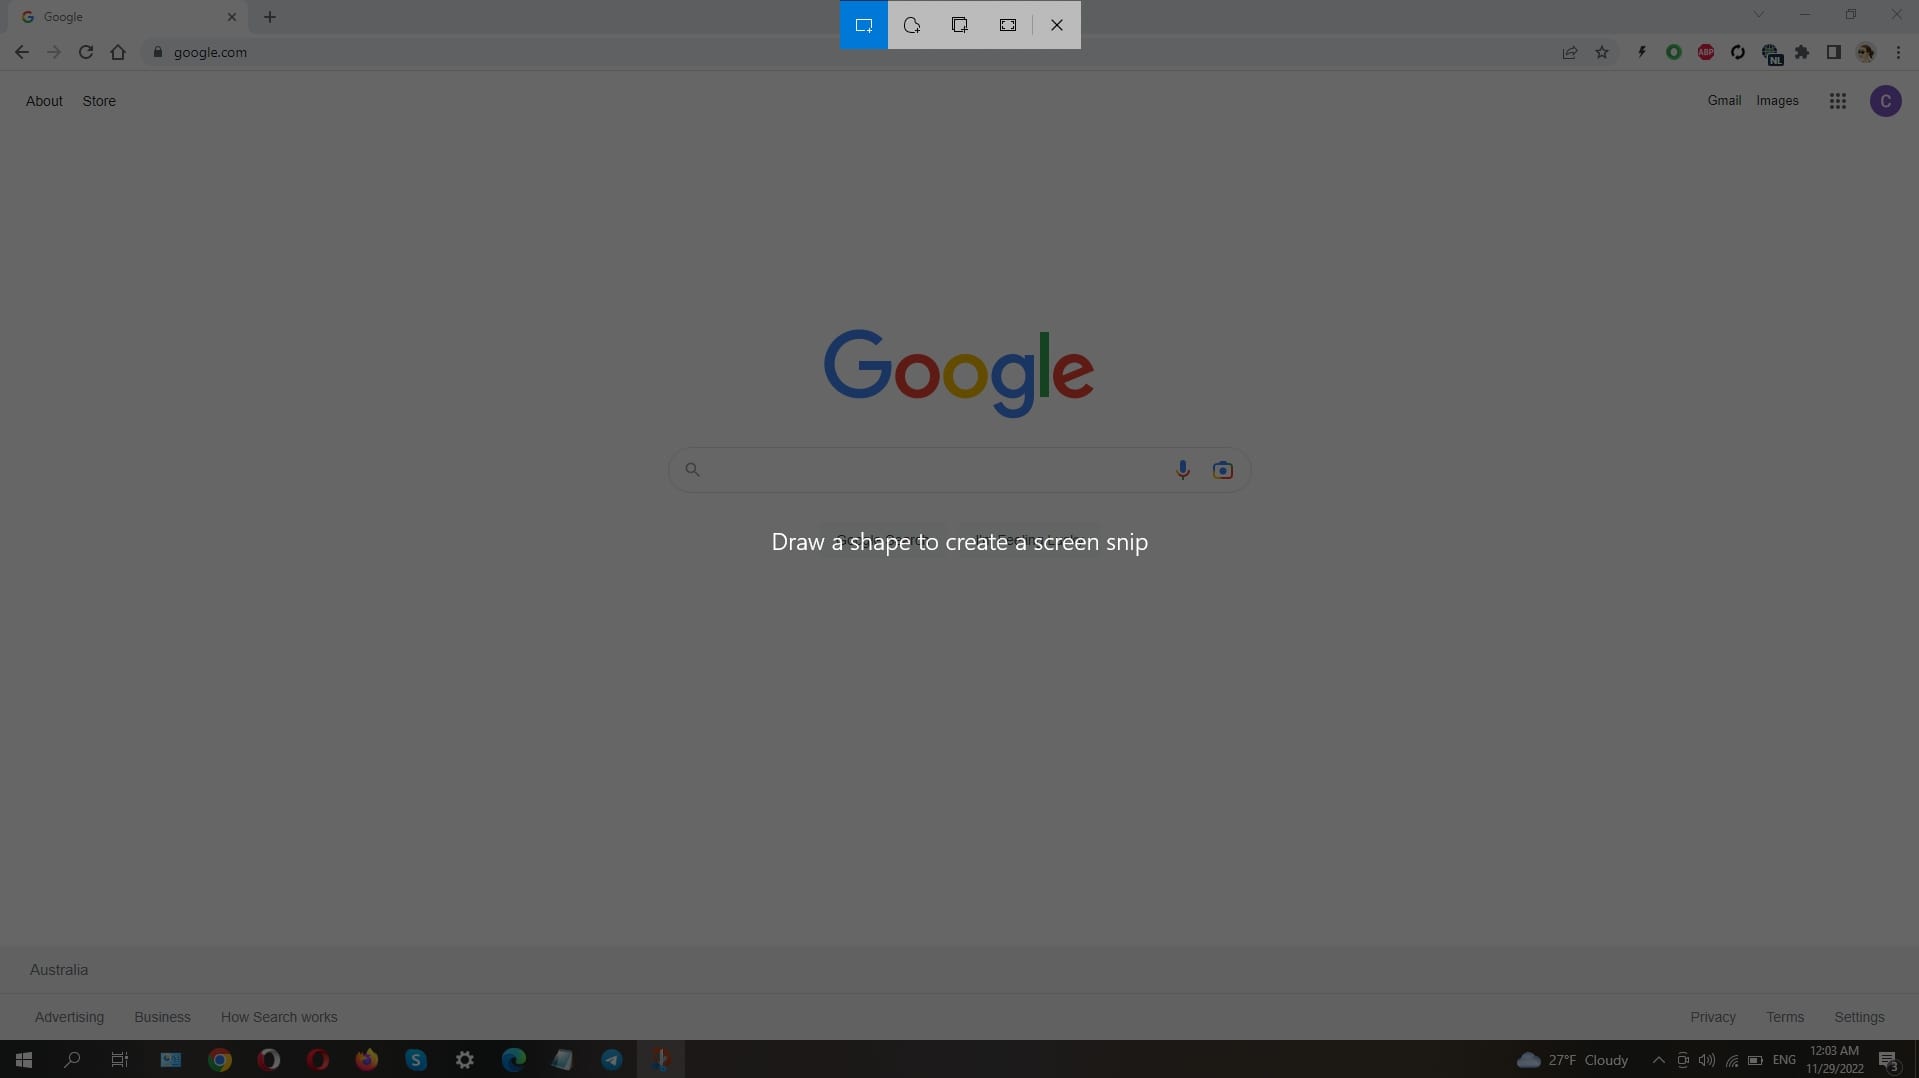
Using Windows + Shift + S Keys on Your Gateway Laptop

The fifth way to take a screenshot on your Gateway laptop is by pressing the Windows key and the “Shift”+”S” keys at the same time.
This will open up a small menu at the top of your screen with options for capturing screenshots. You can choose between taking a full-screen capture, selecting an area of the screen, or taking a single window screenshot.
Select how you want to capture your screenshot and then save it as an image file in your “Pictures” folder.
Tips & Tricks for Taking Great Screenshots
Now that you know how to take screenshots on your Gateway laptop, here are some tips and tricks for taking great screenshots every time:
- Use the right keyboard shortcut so that you capture the whole screen instead of just parts of it.
- Make sure you have enough storage space on your laptop before taking a screenshot as they can take up quite a bit of space.
- Use an external monitor if you’re having trouble seeing what’s on your screen clearly when taking a screenshot.
- Adjust the brightness of your laptop before taking a screenshot to make sure the image looks how you want it.
- Take multiple screenshots if you’re unsure of how something will look, so that you can compare them later to find the one that works best.
Conclusion
So, now you know how to take a screenshot on your Gateway laptop! Whether you are using the built-in tools or downloading third-party software, there are plenty of ways to quickly and easily capture screenshots of your laptop’s screen. So, get out there and start capturing those important moments!


WONDERFUL Post.thanks for share..extra