6 Methods to Fix the Oculus Error Code hdslvc2
Virtual reality is an exciting new technology, but like any new tech, Oculus devices can sometimes run into technical issues. One such error is the cryptic Oculus Error Code hdslvc2. This article will provide an overview of this error – what it is, why it occurs, and most importantly, how to fix it. Properly addressing error codes is crucial for Oculus owners seeking the best VR experience.
Brief Overview of Oculus Error Code hdslvc2

The hdslvc2 error specifically relates to problems syncing your Oculus device with the Oculus mobile app. It appears when the app fails to detect your Oculus hardware. This sync failure usually happens if you lose internet connectivity. Other potential causes include software bugs, power failures, and device incompatibilities. Whatever the source, hdslvc2 errors prevent you from accessing Oculus services and can ruin your VR experience.
Oculus Error Code hdslvc2: Troubleshooting Guide
Navigating the Oculus Error Code hdslvc2 can be a tricky ordeal. This guide provides straightforward, step-by-step troubleshooting methods to help you quickly resolve this common VR issue and get back to your immersive Oculus experience with minimal downtime.
Method #1: Reconnect To Wi-Fi
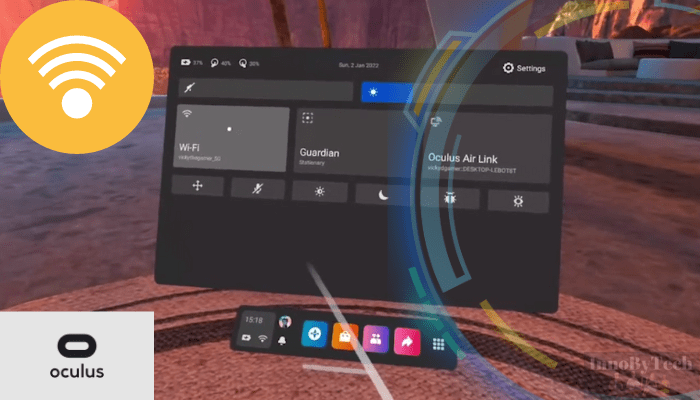
Resolving Oculus Error Code hdslvc2 can be as simple as refreshing your Wi-Fi connection. This approach addresses network-related issues that could be causing the error. Here’s a quick guide:
- Verify Wi-Fi Stability: Check if your Wi-Fi is working properly using another device.
- Disconnect Oculus Wi-Fi: In your Oculus device settings, disconnect from the current Wi-Fi network.
- Restart Router: Reboot your router to clear any network errors.
- Reconnect Oculus to Wi-Fi: After the router reboot, reconnect your Oculus to the Wi-Fi.
- Test the Connection: Access online features on your Oculus to see if the issue is resolved.
Often, a simple Wi-Fi reconnect can fix the hdslvc2 error by updating the network settings on your Oculus device.
Method #2: Check Oculus App Syncing Option
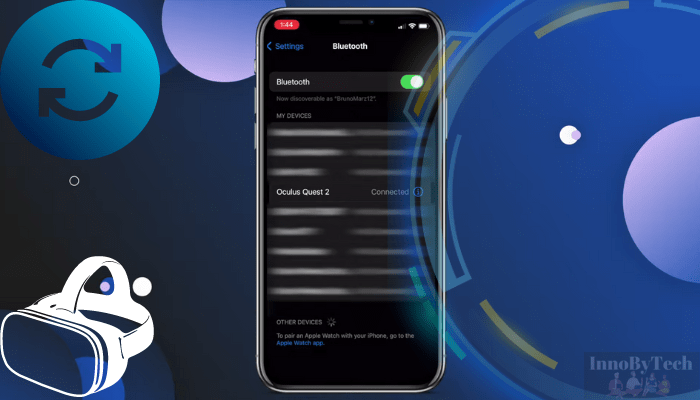
The Oculus Error Code hdslvc2 might be related to syncing problems with the Oculus app. Ensuring proper synchronization is vital. Here’s a condensed guide to address syncing issues:
- Open Oculus App: Launch the Oculus app on your smartphone or tablet.
- Confirm Device Connection: Make sure your Oculus device is properly linked to the app, visible under the app’s device section.
- Inspect Sync Settings: In the app’s settings, check and enable relevant syncing and connectivity options.
- Force Sync: If available, use the ‘Force Sync’ option for a stronger reconnection.
- Restart App and Device: Post-adjustment, restart both the Oculus app and device for the changes to take effect.
- Test Connection: Use your Oculus to see if hdslvc2 error is resolved.
Correcting sync settings in the Oculus app can often fix communication issues, potentially eliminating the hdslvc2 error.
Method #3: Log Out And In Again
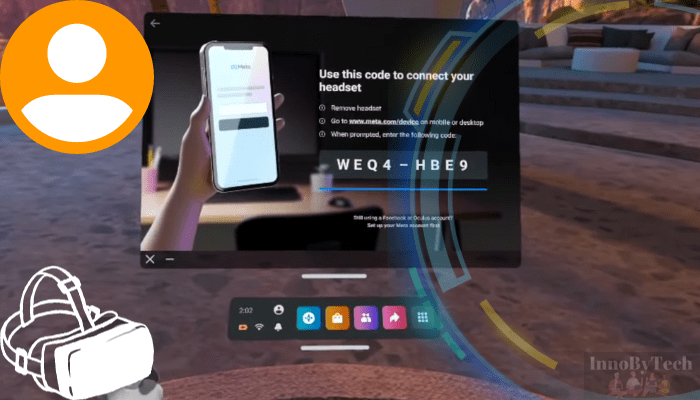
Resolving Oculus Error Code hdslvc2 may be as straightforward as logging out and back into your Oculus account. This refreshes your settings and can clear glitches. Here’s a quick walkthrough:
- Access Settings: On your Oculus device, go to the settings from the home screen.
- Find Account Settings: In settings, locate and select the section for your account.
- Log Out: Choose the log out option and confirm.
- Restart Oculus Device: Post-logout, reboot your device to clear any cached data.
- Log In Again: Once restarted, log back into your Oculus account, ensuring correct credentials.
- Verify Fix: Use your device as normal to check if the error hdslvc2 is resolved.
This simple re-login process often resets the device-account connection, effectively tackling the hdslvc2 error.
Method #4: Update Your Software
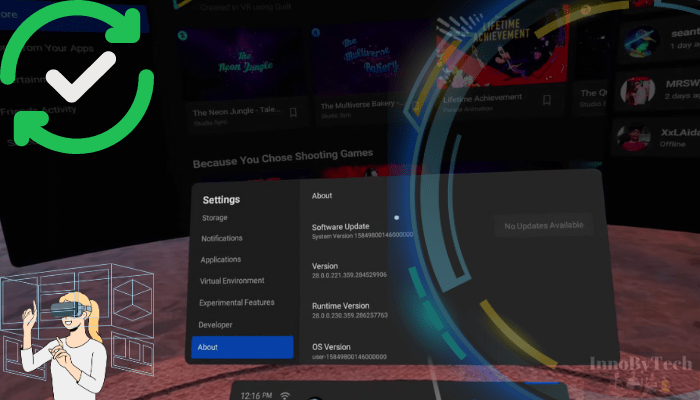
Regular software updates are key to preventing issues like Oculus Error Code hdslvc2. Updates can fix bugs and boost performance. Here’s a quick guide to update your Oculus software:
- Check for Updates: In your Oculus device settings, find the section for software updates.
- Enable Automatic Updates: Turn on automatic updates for hassle-free downloads and installations of new updates.
- Manually Check Updates: If you prefer manual updating, select the option to search for updates and see if any are available.
- Install Updates: Download and install any available updates, ensuring a stable internet connection.
- Restart Oculus Device: Post-update, restart your device for the changes to take effect.
- Confirm Error Fix: With the latest software, verify if the hdslvc2 error is resolved.
Staying up-to-date with software updates is crucial for a smooth Oculus experience and can effectively resolve various technical issues.
Method #5: Factory Reset
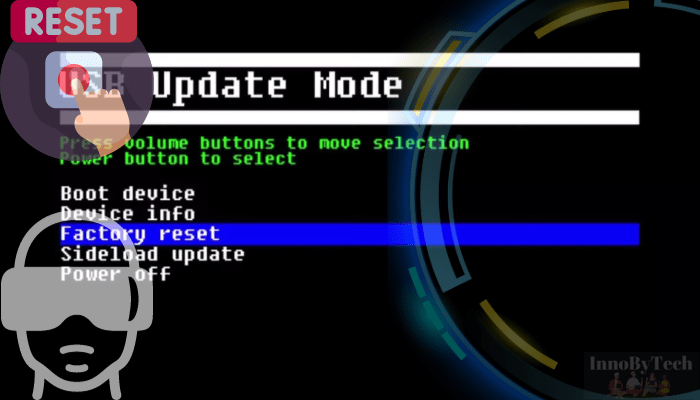
If you’re still encountering Oculus Error Code hdslvc2 after trying previous methods, a factory reset could be the solution. This step will restore your Oculus device to its original settings, erasing all data, including apps, settings, and saved games. Before proceeding, ensure you back up any important data.
To perform a factory reset, navigate to your device’s settings and select the ‘Factory Reset’ option. Confirm your choice and wait for the process to complete. After the reset, you’ll need to set up your device from scratch, including logging into your Oculus account and reinstalling apps. This comprehensive reset often resolves persistent software-related issues.
Method #6: Contact Support
If you’ve tried all previous methods and the Oculus Error Code hdslvc2 persists, it’s time to contact Oculus Support. Reach out to their team for personalized assistance. Provide details about your device, the specific error code, and the troubleshooting steps you’ve already attempted. Oculus Support can offer more in-depth solutions, potentially identifying issues specific to your device that general troubleshooting might not address.
Tips from Oculus Users
Oculus users, like any technology enthusiasts, encounter a range of issues daily. Error code hdslvc2 is one such common problem. Here, we share experiences from fellow users who’ve successfully navigated and resolved this issue, providing valuable insights from their personal journeys.
May Lester’s Experience
“I faced the dreaded hdslvc2 error last month. Initially baffled, I soon realized the issue was with my Wi-Fi. A simple router reboot and reconnection to my Oculus solved it. It reminded me that sometimes, the simplest solutions are the most effective. Always check your network first if you encounter this error.”
Fox Tobi’s Solution
“When the hdslvc2 error first popped up, I was completely stumped. A bit of digging led me to suspect a syncing problem. Sure enough, when I checked, the Oculus app syncing had halted. Merely restarting the app made no difference, so I opted to log out of my account and then log back in. This straightforward step miraculously rebooted the syncing. Thankfully, this resolved the error. My takeaway from this experience is to always pay attention to fundamental aspects like account settings and app operations.”
Adams Shon’s Approach
“Dealing with the hdslvc2 error was frustrating. I tried several fixes, but what worked was updating my Oculus software. It turns out, I had missed a crucial update. So, always keep your device updated to avoid such issues. It’s a straightforward yet often overlooked solution.”
Final Words
In summary, the Oculus Error Code hdslvc2, while troublesome, is not insurmountable. By following our step-by-step guide and considering the experiences of fellow Oculus users, you can overcome this hurdle and return to your immersive VR adventures. We encourage you to try these solutions and share your experiences or further inquiries in the comments section below. Your feedback not only helps us but also the wider Oculus community.